Eclipse RCP/RAP with Spring DM, Spring Data JPA and Remoting [step10]
In [step9] we have displayed the User List with pagination by using Nebula Pagination Control and Spring Data JPA. As Nebula Pagination Control supports RAP, it’s possible with few modifications of the fr.opensagres.richclient to support WEB mode too with Eclipse RAP:
At the end of this article we will have an Application which supports:
- Desktop context with Eclipse RCP:

- WEB context with Eclipse RAP :

The sources of the fr.opensagres.richclient Plug-In will be the same: it’s called Single-Sourcing.
Download
You can download eclipsespring_step10.zip which contains the following explained projects :
- fr.opensagres.domain : OSGi bundle domain which hosts fr.opensagres.domain.User class.
- fr.opensagres.dao : OSGi bundle Dao API which hosts fr.opensagres.dao.UserDao interface.
- fr.opensagres.dao.mock : OSGi bundle Dao Mock Implementation (Dao implemented with Java Map) which hosts a Spring file which declares the implementation of UserDao in a Spring bean and publish it the OSGi services registry with Spring DM <osgi:service.
- fr.opensagres.dao.jpa the bundle implementation of UserDao with JPA by using Spring Data JPA to avoid coding the JPAUserDao class.
- fr.opensagres.dao.jpa.eclipselink the fragment which configures the JPA fr.opensagres.dao.jpa to use EclipseLink and Deby as dialect.
- fr.opensagres.data.datasource the bundle which publishes the Derby Datasource used by the fr.opensagres.dao.jpa.
- fr.opensagres.services : OSGi bundle Services API which hosts fr.opensagres.services.UserService interface.
- fr.opensagres.services.impl : OSGi bundle Services Implementation which hosts a Spring file which declares the implementation of UserService in a Spring bean and publish it the OSGi services registry with Spring DM <osgi:service.
- fr.opensagres.data.injector : OSGi bundle Data Injector which hosts a Spring file which declares a DataInjector in a Spring bean. This DataInjector consumes the UserService injected by Spring which is retrieved from the OSGi services registry with Spring DM <osgi:reference and call UserService#saveUser(User user) to inject User data.
- fr.opensagres.simpleclient : OSGi bundle simple client which hosts a Spring file which declares a thread in a Spring bean. This thread consumes the UserService injected by Spring which is retrieved from the OSGi services registry with Spring DM <osgi:reference.
- fr.opensagres.richclient :RCP client which displays in a SWT Table the User list. The ViewPart consumes the UserService injected by Spring which is retrieved from the OSGi services registry with Spring DM <osgi:reference by using the SpringExtensionFactory.
- fr.opensagres.richclient.config.rap : OSGi fragment which configures RAP.
- fr.opensagres.config.log4j : OSGi fragment which configures log4j.
- TargetPlatform: simple project which hosts the Spring DM JARS, the target definition and launch.
To use this zip with Eclipse RCP, unzip it :
- import those projects in a workspace.
- open the TargetPlatform/eclipsespring.target file and click on Set as Target Platform. If you have problem with Target Definition, please read Problem with Install with Nebula (Incubation) P2.
- select TargetPlatform/launch/Simple OSGi client.launch – Mock Dao to test the launch with Mock Dao and Run it.
- select TargetPlatform/launch/Simple OSGi client.launch – JPA Dao to test the launch with JPA Dao and Run it.
- select TargetPlatform/launch/RCP Client – Mock Dao.launch to test the RCP Application with Mock Dao and Run it.
- select TargetPlatform/launch/RCP Client – JPA Dao.launch to test the RCP Application with JPA Dao and Run it.
To use this zip with Eclipse RAP, unzip it :
- import those projects in a workspace.
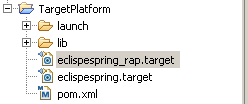
- open the TargetPlatform/eclipsespring_rap.target file and click on Set as Target Platform. If you have problem with Target Definition, please read Problem with Install with Nebula (Incubation) P2.
- select TargetPlatform/launch/Simple OSGi client.launch – Mock Dao to test the launch with Mock Dao and Run it.
- select TargetPlatform/launch/Simple OSGi client.launch – JPA Dao to test the launch with JPA Dao and Run it.
- select TargetPlatform/launch/RAP Client – Mock Dao.launch to test the RAP Application with Mock Dao and Run it.
- select TargetPlatform/launch/RAP Client – JPA Dao.launch to test the RAP Application with JPA Dao and Run it.
Install Eclipse RAP
In this section we will download RAP Plug-Ins with P2.
Install Eclipse RAP with P2
In our case we have a Target Definition, so we will use Eclipse RAP 1.5 with P2 to benefit from the last version (here we will use RAP 1.5).
In this section we will create the new Target Definition eclipsespring_rap.target with RAP. To do that:
- copy/paste the eclipsespring.target that we have created on [step1] to eclipsespring_rap.target :
- open eclipsespring_rap.target and remove the org.eclipse.rcp feature
Now we will add RAP Plug-Ins to the new target definition. Click on Add… button:

This action opens the Add Content wizard :

Select Software Site and click on Next button:

Fill
- Work with field with the P2 URL http://download.eclipse.org/rt/rap/1.5/runtime
- select Rich Ajax Platform (RAP) top node.
- select Include all environments.
And click on Finish Button. The Eclipse RAP is added to the Target Definition. Click on Set As Target Platform, to use it :

Problem with Install with RAP P2
If you have problem like « Unable to locate installable unit… », please read here.
Rich Client Plug-In
At this step RAP is installed and activated in the Target Paltform. You will notice that there is a lot of compilation problem with the fr.opensagres.richclient Plug-In:

This problem comes from the use of the Require-Bundle org.eclipse.ui in the fr.opensagres.richclient/META-INF/MANIFST.MF:
Require-Bundle: ...
 org.eclipse.ui
 ...
The org.eclipse.ui Plug-in is not found. For RAP we must use org.eclipse.rap.ui. We could remove org.eclipse.ui and add org.eclipse.rap.ui Plug-In, but we wish manage RCP and RAP Application with the same Plug-In. To do that we use optional resolution :
Require-Bundle: ...
 org.eclipse.ui;resolution:=optional,
 org.eclipse.rap.ui;resolution:=optional
 ...
Modify the fr.opensagres.richclient/META-INF/MANIFST.MF like this :
Manifest-Version: 1.0
Bundle-ManifestVersion: 2
Bundle-Name: Richclient
Bundle-SymbolicName: fr.opensagres.richclient; singleton:=true
Bundle-Version: 1.0.0.qualifier
Require-Bundle: org.eclipse.core.runtime,
 org.eclipse.ui;resolution:=optional,
 org.eclipse.nebula.widgets.pagination,
 org.eclipse.rap.ui;resolution:=optional
Bundle-RequiredExecutionEnvironment: J2SE-1.5
Import-Package: fr.opensagres.domain,
 fr.opensagres.services,
 org.eclipse.springframework.util,
 org.springframework.data.domain
And that’s all!
Run RAP
At this step we can create the 2 RAP launches like RCP launches.
RAP Client – Mock Dao
In this section we will create the RAP Client – Mock Dao. To do that, open the Run Configurations dialog, select RAP Application node, and select the New contextual menu. This action will create you a RAP Application launch where every bundles are selected.
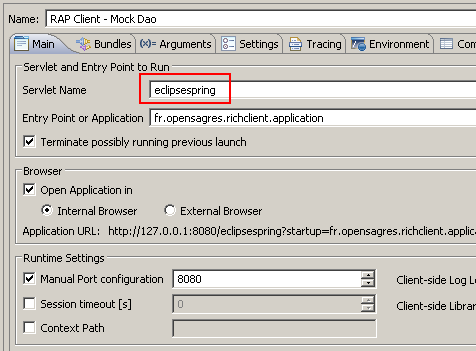
In main tab:
- rename the launch with RAP Client – Mock Dao.
- select the servlet name « rap« .
- select the application fr.opensagres.richclient.application (this id comes from the bundle name + plugin.xml/application/@id).
- Set the Manual Port configuration to 8080 to fix the port.

Select the well bundles like RCP for Mock Dao (see the TargetPlatform/launch/RAP Client – Mock Dao.launch if you have problem).

Note: Unselect Add new workspace bundles to this launch configuration automatically.
Run the launch, open a WEB Browser and go at http://127.0.0.1:8080/rap?startup=fr.opensagres.richclient.application. You will see the application in WEB mode with this theme :

RAP Client – JPA Dao
Duplicate the RAP Client – Mock Dao and select the well bundles like RCP for JPA Dao (see the TargetPlatform/launch/RAP Client – JPA Dao.launch if you have problem).
Run the launch, open a WEB Browser and go at http://127.0.0.1:8080/rap?startup=fr.opensagres.richclient.application. You will see the application in WEB mode with this theme :
Run RAP with fragment configuration
At this step our RAP APplication uses:
- the commons rap servlet.
- the default theme.
Here we will configure for our RAP Application a servlet name which uses other theme. To do that we will create an OSGi fragment linked to our fr.opensagres.richclient Plug-In.
Create the OSGi fragment fr.opensagres.richclient.config.rap linked to the fr.opensagres.richclient Plug-In.
fragment.xml
Create the fragment.xml like this:
<?xml version="1.0" encoding="UTF-8"?>
<?eclipse version="3.4"?>
<fragment>

   <extension
         point="org.eclipse.rap.ui.branding">
      <branding
            servletName="eclipsespring"
            themeId="org.eclipse.rap.design.example.business.theme"
            defaultEntrypointId="fr.opensagres.richclient.application"
            title="RAP Application"
            id="fr.opensagres.richclient.branding">
      </branding>
   </extension>

</fragment>
Here we configure a RAP servlet to use the org.eclipse.rap.design.example.business.theme theme coming from the org.eclipse.rap.design.example bundle.
MANIFEST.MF
As fr.opensagres.richclient is a singleton (because it’s an Eclipse Plug-In), our fragment must be too be a singleton too:
Bundle-SymbolicName: fr.opensagres.richclient.config.rap;singleton:=true
Modify the fr.opensagres.richclient.config.rap/META-INF/MANIFEST.MF like this :
Manifest-Version: 1.0
Bundle-ManifestVersion: 2
Bundle-Name: RAP Config
Bundle-SymbolicName: fr.opensagres.richclient.config.rap;singleton:=true
Bundle-Version: 1.0.0.qualifier
Fragment-Host: fr.opensagres.richclient;bundle-version="1.0.0"
Bundle-RequiredExecutionEnvironment: J2SE-1.5
Run
Before running the RAP launch, you must modify (the 2 RAP launches) like this :
- select the eclipsespring servlet in the launch:
- select the fr.opensagres.richclient.config.rap fragment.

- select org.eclipse.rap.design.example bundle which provides the org.eclipse.rap.design.example.business.theme theme
If you run the launch and you open a WEB Browser at http://127.0.0.1:8080/eclipsespring?startup=fr.opensagres.richclient.application, you will see this RAP Application with a new theme :
Run & Single-Sourcing
At this step we have an Eclipse Application which works both in Desktop mode (RCP ) and WEB mode (RAP). You need to have 2 workspaces which shares the same bundles:
- a RCP workspace where eclipsespring.target is activated.
- a RAP workspace where eclipsespring_rap.target is activated.
Conlusion
In this article we have seen how to manage our existing RCP Application with RAP application to benefit from WEB mode. With Single-Sourcing feature, our Rich Application can be used in 2 contexts:
- on Desktop context with Eclipse RCP.
- on WEB context with Eclipse RAP.
In [step11], we will see how to we can manage remoting.

Hello,
You did a great job.
Very useful articles for me.
Thank you.
But I got trouble on step 10 while running RAP Client Mock Dao:
org.eclipse.swt.SWTError: Not implemented [multiple displays]
at org.eclipse.swt.SWT.error(SWT.java:4387)
at org.eclipse.swt.widgets.Display.checkDisplay(Display.java:757)
at org.eclipse.swt.widgets.Display.create(Display.java:898)
at org.eclipse.swt.graphics.Device.(Device.java:156)
at org.eclipse.swt.widgets.Display.(Display.java:497)
at org.eclipse.swt.widgets.Display.(Display.java:488)
at org.eclipse.ui.internal.Workbench.createDisplay(Workbench.java:666)
at org.eclipse.ui.PlatformUI.createDisplay(PlatformUI.java:161)
at ru.webeffector.richclient.Application.start(Application.java:18)
at org.eclipse.rap.ui.internal.application.EntryPointApplicationWrapper.createUI(EntryPointApplicationWrapper.java:38)
at org.eclipse.rwt.internal.lifecycle.RWTLifeCycle.createUI(RWTLifeCycle.java:177)
at org.eclipse.rwt.internal.lifecycle.RWTLifeCycle$UIThreadController.run(RWTLifeCycle.java:289)
at java.lang.Thread.run(Thread.java:662)
at org.eclipse.rwt.internal.lifecycle.UIThread.run(UIThread.java:102)
IDE: Eclipse Juno.
I will appreciate for your help.