
So you want to know how to tie a tie, but you want to keep it simple and easy and just get on with your life? I hear ya. If you Google “How to tie a tie easy” you’re bound to find a gajillion different supposedly simple ways. I say, ignore ALL those methods.
There are only two easy tie knots you should master: The Four-In-Hand and the Pratt knot. They’re easy to learn and they look great with a bunch of different dress
So let’s learn how to tie the Four-in-Hand and the Pratt knot.

1. The Four-In-Hand Knot
The Four-In-Hand is the standard, classic tie knot. It’s a simple knot to learn, and if you only learn one, it should be this one. It’s easy to execute and looks great with many different collar styles.
This particular style produces a (relatively) small knot that appears slightly asymmetrical and narrow compared to the Pratt knot.
Which
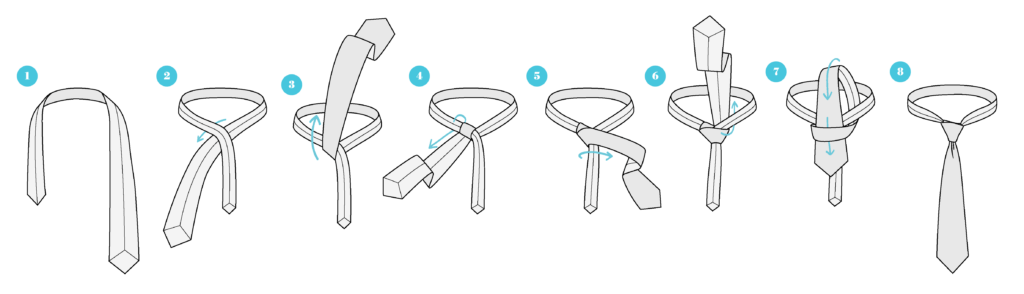
How To Tie a Four-In-Hand Knot: A Step By Step Tying Method
Start with the narrow end (the tail) on your left side, and the wide end (the front blade) on your right.
The tip of the narrow end should stop right around your belly button. You’ll have to test for yourself, since it depends on your height and torso length. The tail always stays still, you’re moving the front blade around.

- Cross the wide end over the narrow end, and then wrap underneath. The underside of the wide end should be showing at this point.
- Cross the wide end over once more, but instead of crossing back underneath, go up through the neck loop. The tie should be right side up now.
- Take the tip of wide end through the loop you just made by crossing over twice. This is the step that finalizes the tie knot.
- Tighten the knot by pulling down on the wide end.
- Keep your index finger at the center of the front blade by the bottom of the tie knot, with your thumb and middle finger pinching each side of the wide end as you pull down. This helps form the dimple. Using your other hand, keep the knot secure as you pull down the wide end and tighten the knot.
- Double check the final necktie length. The tip of the wide end should ideally go past the top of your pants waist. The skinny end can be tucked into the tie loop or tag, and ideally is shorter / the same length as the front blade.
- Adjust the shape and tightness of the knot. You’re done!
2. The Pratt Knot
I like the Pratt Knot (also called the Shelby Knot) because it produces a nice triangular, symmetrical knot without being too bulky and large (unlike the Windsor knot). The Windsor knot is fine, but I think too big in most cases, and seems to work well only if you have the right tie.
Which
How To Tie a Pratt Knot: A Step By Step Tying Method
Start with your tie wrong side up (back of tie showing), the tail (narrow end) on your left side, and the front blade (wide end) on your right.
The tip of the tail should end right around your belly button (test for yourself, since it depends on your height and torso length). And just like with the Four-In-Hand, the tail always stays still. You’re only moving the front blade.
- The front blade crosses underneath the tail.
- The front blade goes through the neck loop from the top. Make sure the front blade exits the loop on the left side. The front blade should still be back side up.
- Take the front blade across the tail to the right side. As you do this, the front blade is now right side up.
- Take the front blade through the neck loop again, up from underneath.
- Finally, the front blade goes down and through the front loop you just made. This forms and finalizes the tie knot.
- Tighten the knot by pulling down on the front blade. Keep your index finger at the center of the front blade with your thumb and middle finger pinching each side of the blade as you pull down. This helps form the dimple. Using your other hand, keep the knot secure as you pull down the front blade and tighten the knot.
- Double check the final tie length. The tip of the front blade should ideally go past the top of your pants waist. The tail can be tucked into the tie loop or tag, and ideally is shorter / the same length as the front blade.
- Adjust the shape and tightness of the necktie knot. You’re done!
“What about all the other tie knots?”
“Hey B, what about the Double Windsor Knot? The Half Windsor? The Trinity Knot? Should I know how to tie those, too?”
It won’t hurt to know a variety of tie knots.
Some knots have multiple names. The Prince Albert Knot, for example, is also known as the Double Four-In-Hand. The Simple Knot is also called the Oriental Knot.
Some knots are more complicated and need extra long ties (at least in my experience) like the Windsor knot. Even the Half Windsor knot is too fussy and bulky for my taste.
And then you have knots like the Trinity Knot which I suggest you stay away from completely. It’s too cutesy and corny and far from classic.
But when we get down to brass tacks, an effortless gent really only needs to know the two tie knots I pointed out here: The Four-In-Hand and the Pratt knot.
Master these, and you’re good to go!