

form•Z lab plugins for v9
The form•Z LAB plugins are available for form•Z v9. A single installer installs all of the plugins for form•Z, pro form•Z jr or form•Z Student and Faculty Edition.
The form•Z LAB plugins are available for form•Z v9. A single installer installs all of the plugins for form•Z, pro form•Z jr or form•Z Student and Faculty Edition.
3d landscape painted in formZ 8 with the LAB’s Paint Objects tool. Rendered in Maxwell.

A crowded museum.
A dryscaped home surrounded by artfully arranged boulders, small stones, and grasses.
A wooded hill, with trees thinning at the edge of new development.
Most architectural presentations require more that a photographic backdrop to bring it to life. Entourage elements are not ust decoration, but serve to complete the site’s character, or to demonstrate how people will use the space. In the case of the museum, it will feel sterile and unapproachable if not sufficiently populated with small groups of visitors. The design intent of the house is mischaracterized if its edges are not ‘eased’ by the landscaping. And the development’s relationship to the existing natural context must be made clear to all stakeholders.
In the past, placing convincingly random entourage could be a bit of a chore. To instance a thousand randomly-oriented, unique stones might mean many thousands of clicks for placement, scaling, and rotation. And bear in mind that you won’t want those stones to self-intersect, so you’ll have to be careful. With the LAB’s new Paint Objects tool, placing those thousand stones is as simple as a click-drag of the mouse.
Paint Objects uses a spray-paint metaphor to dynamically place objects onto other objects. Select your source geometry, which may be any number of objects, groups, or components. Then, click on the object you’d like to spray the geometry onto, and drag to paint. Release that mouse button when done with your stroke. That’s the simplest operation, but there are many options to make this a flexible and powerful tool:
• Any number of source objects/groups/Components may be selected. They will be placed randomly, but in equal proportions.
• Go light or heavy with placement density.
• Brush diameter specified in real-world units.
• Use the Linear and Cubic brush falloff options to paint clusters of objects with convincingly natural areas of higher concentration.
• Automatically eliminate intersections between placements with three grades of collision detection.
• Random rotation control.
• Random scaling proportional to the original source object, or specified by real-world dimensions.
• Orient normal to the surface normal you are painting on, or to one of the planes (e.g. XY plane for trees growing strait up)
• Use the brush to paint on any and all objects in your scene- not just a preselected 'terrain’ object. (There is the option to paint on just the first clicked object, however.)
• Groups and Components are fully supported. Group hierarchies are preserved when copied and placed, and Components remain components to keep your resource footprint at a minimum.
Of course, Paint Objects is not limited to architectural uses. It can be used for any creative purpose requiring natural-looking distribution: Leaves on a reflecting pool, a mountain of chocolates, or an armada of spacecraft. We look forward to seeing what you’ll do with it. Please post feedback on the LAB forum, here.
The Paint Objects plugin is available for free, as part of the LAB Transform Collection. Full instructions and download link here.
Enjoy!
A well organized project is a joy to work with–– and the opposite can be said for a disorganized one. Continuing our quest to promote good project organization from the get-go–– and minimize end-of-project cleanup–– we’re introducing two new commands to make layers management a bit easier.
When you want to switch to another layer, there are usually objects visible in your project that are already on the layer. What if you could just select one of those objects and go directly to its layer? That’s just what the Active Layer from Selection command does. Key-shortcut this one, and you’ll spend a lot less time scrolling through dozens layers to find the right one.
Focus on Layer works just like Active Layer from Selection, but it presents a dialog with options to ghost, hide, or lock other layers. Good for those cases where your work requires your to isolate a single layer.
Both available for Free, as part of the LAB Manager Collection. Download it here.
Yes, perhaps one should always make an appropriately named layer– and activate it– before modeling something new. But early in the design process we’re usually focused on designing, not organization. Organization will come… well, later.
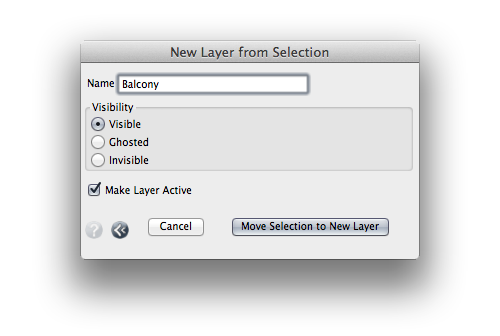
This little command will help you get organized at any point. Just select existing objects, invoke New Layer from Selection, and type the name of a new layer to which the objects will be moved. There’s a checkbox to make the new layer active, too, so you can continue modeling on that layer if you wish.
We find that with large imported models, we’re usually trying to organize and then hide as much geometry as possible, to get to relevant context, so there’s also an option to immediately ghost or make the new layer invisible.
Rename Objects is available for Free, as part of the LAB Manager Collection. Download it here.
Well-named objects clarify your design intent and aid collaboration with designers and fabricators. Cleaning up those names also eliminates frustration when searching through the objects palette.

Rename Objects automates the renaming process, providing:
• Live preview of batch name changes, before you commit
• Selection filters
• Search and Replace
• Removal of ‘Copy’ text and trailing numbers from names
• Batch renaming based on object attributes such as object type, material, and layer
• Capitalization and case changes
• Serial Renumbering
This should be the last batch object renamer you’ll ever need.
Rename Objects is available for Free, as part of the LAB Manager Collection. Download it here.
This command increments your project file number and saves the project. (e.g. “Design Scheme 09.fmz” will be bumped to “Design Scheme 10.fmz.)
Assign this to a key shortcut and use it liberally, and you’ll never loose a good design. There will be always be a trail documenting your process, and if necessary, you can backtrack at any point.
This is the first command in the Free LAB Manager Collection: Download it here.
A lot work was done under the hood to modernize formZ 8. Unfortunately, the along with all the improvements, new technologies have made scripts dating from the formZ 6 era require some work before they will run in formZ 8.
While the best ideas from many of those extensions have been polished and incorporated directly into formZ— like Isolate/Reveal Objects— a few gems that we’d come to rely on are still missing.
The LAB is going to take this opportunity to curate the most useful extensions, rewrite and improve them, and package them into related plugin collections. Of course, we’ll be adding new stuff as well.
We’d be delighted to get your feedback— which of the formZ 6/7 extensions would you most like to see brought back? Let us know, on the formZ LAB Forum.
By popular request, “Save with Incremental Filename” will be the first for reissue…
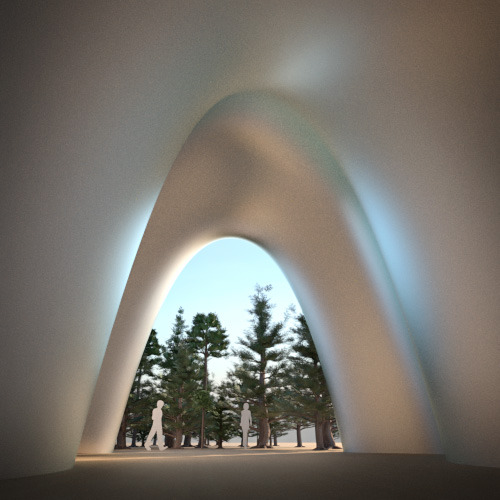
Catenaries with the new LAB tool were used to create the NURBS shell in this study. Image by the formZ LAB.
A chain, hanging under its own weight with both ends anchored, forms the characteristic curve know as the catenary. An overhead utility wire, a tram cable, and a chain connecting two posts will each assume this form.
Catenaries have a rich history in architecture and design, most famously in the work of Antonio Gaudi and Saarinen’s Gateway Arch. With the advent of computational design, there has been a resurgent interest the properties and aesthetics of the catenary.
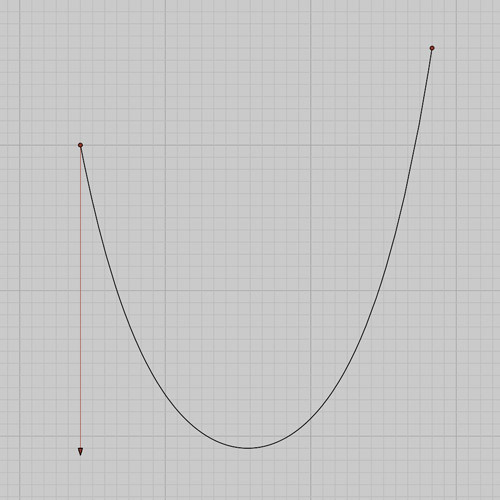
With the Catenary tool, you can construct these curves in natural, interactive manner. Choose a hanging or inverted curve, click anywhere in 3D space to establish the curve endpoints, then drag up and down to control the depth. There’s also an option to control the catenary by the length of the curve: the catenary will maintain the length you’ve specified as you drag the two endpoints about. The resulting Catenaries are parametric objects, so you can adjust their controls at any time after creation.
Catenaries can be used as inputs to derivative object types such as extrusions, sweeps, and NURBS surfaces.
The Catenary Tool is part of the Free LAB Primitives Toolset:
Download the Catenary tool
Whether you’re designing in metal, wood, or plastic, you’ll need estimates of your material use to keep within budget. Sometimes quantities are necessary to stay within engineering limits. And if you’re responsible for fabrication, you’ll want organized cut lists before you begin to save time and reduce waste.
The Profiles Report command provides information about the quantities and lengths of each Profile type in your project, instantly. Best of all, they are automatically grouped and sorted into cut lists. Summaries for each Profile type are also provided.
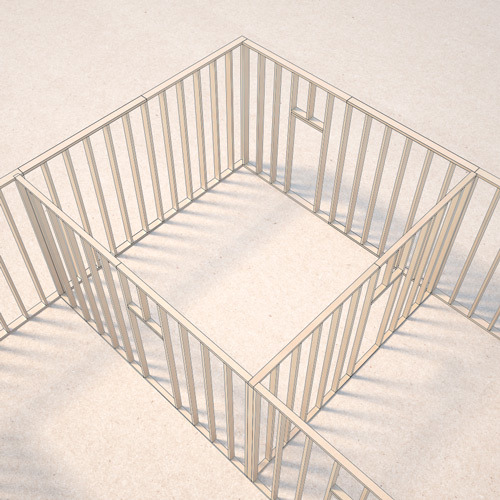
In the example above, the 2x4 and 2x6 framing has been created using Profiles. At any point during development, you can generate a Profiles Report and get the total length and cut lists, for both types of lumber.
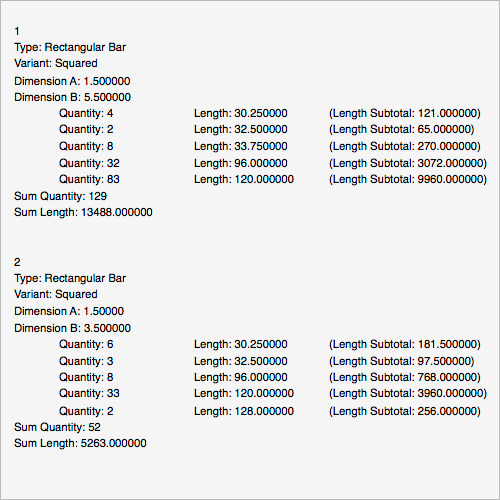
Of course, this works will all the profile shapes, so you can get take-offs and cut lists for structural beams, strait tubing, and all the rest.
Top
